Search

Divine Intervention

Tastes and tidbits from a Mom trying to live for Christ.

A Bit of a Throwback

All of my favorite desserts involve peaches in one way or another.  To this day, one of my all-time favorite foods in the world (other than bacon, duh) is my mom’s hot peach cobbler. (Shout out to Mama Janice!) Growing up in Oregon, the end of summer was always my favorite because that’s when we got fresh local peaches and got a fill that would last us the year.  Peach milkshakes, peach cobbler, peach crisp (yes, they’re totally different), peaches over ice cream, peaches in pancakes, eating the peaches straight off the pit. And of course, my brain goes back to grade school and that infamous song by the Presidents of the United States of America….”millions of peaches, peaches for free, millions of peaches, peaches for me.”  Gah! My mouth is watering just thinking about it…  Anywho! My husband, Chris found fresh peaches on sale at the grocery store for 70 cents per pound, so I just knew I had to make something delicious that would just stick to our sides and warm us from the inside out (not that we need any help in that department during a Phoenix Summer). I’ve been on a pie kick lately and Chris said he had never actually had a peach pie, so I really didn’t have a choice. I made peach pie.

IMG_8986

Classic Peach Pie

2 10-inch pie crusts (I’ll admit, I’ve used store-bought refrigerated dough countless times for pie, and they work great!  But I’ve been in a kick of making things homemade to better myself, so my recipe is to follow)

Flour for rolling out dough

6 cups peeled, sliced peaches (you can even use frozen peaches for this, just make sure you thaw and drain them well)

2/3 cup sugar

1/3 cup all-purpose flour

1 tbs cornstarch (you may want more if your peaches are extra juicy, or if you’re using frozen peaches, which will naturally produce more juice while they bake)

1 tsp lemon juice

1/2 tsp ground cinnamon

1 tbs butter (optional)

1 egg

Sugar for sprinkling

Preheat oven to 425 degrees Fahrenheit.

Take half of your pie dough and place it onto a well-floured surface. (I recommend shaping it into a ball or round disk to making the next step a little easier). Roll out your pie dough until it is about 1/8 inch thick.  Roll in all directions, to try to make it a round shape (it won’t be perfect).

IMG_8983

Place what is now your bottom pie crust into your 9-9 1/2 inch pie plate. Here is an excellent YouTube video on rolling out and transferring your pie dough to your pie plate. (Click the Link)

In a large bowl, mix together your Peaches, sugar, flour, lemon juice and cinnamon until peaches are well-coated and ingredients are incorporated. Here’s a photo of my peaches so you can see how large I sliced them.

IMG_8982

Next, pour your peach mixture into your pie shell and even out as much as possible with a spoon or fork. If desired, dot with your 1 tbs of butter (I recommend cutting it into at least 4-5 pieces if you do this step).

Roll out your second half of pie dough just like you did your first half and center over your pie topping. Press against your bottom pie dough on the edge of your pie plate to create a good seal. You can do this by hand and add a decorative edge by pinching dough together, or use a fork. Then, make sure to carefully cut slits with a sharp knife into the top of your curst, which will allow steam to escape during the baking process.IMG_8984Next, beat your egg in a small bowl and using a pastry brush (or even a wadded up paper towel will work for this in a pinch), brush a light coating of the egg on top of your pie. (this is called an egg wash and will create a nice sheen on the cooked pie). Then lightly sprinkle sugar over the top. (This will add a kind of “sparkle” to the cooked pie, as well as a sweet crunch).

Bake for 45 minutes. I check the pie after about 30 minutes to make sure it’s not browning too fast. If it is, just place a sheet of foil over the top. You want to bake until you can see/hear the filling bubbling and the crust is nice and golden brown.

IMG_8985

Let pie sit for at least 20 minutes, to help the filling set up and cool (otherwise, you won’t be able to taste anything because you would have melted all your tastebuds off).

Slice and enjoy!  Well….I suppose you don’t HAVE to slice it. Enjoy it right out of the pie pan, if you like! 😉

Ok…time for some honesty. So, when I made this pie the first time, I actually added 1 tbs of freshly grated ginger to the pie, thinking it would add some warmth and spice. Honestly, I didn’t care for it. While it tasted fine, the pie no longer had that warm nostalgia that I was looking for; it almost added a sharp flavor. So, I didn’t include it in this recipe. Also, it didn’t have enough cinnamon for my taste, so I upped the amount. And, I added a bit too much cornstarch and it wasn’t quite as “Saucy” as I would have liked.  So…the recipe you see above are with my improvements. I hope you like it! If so, tell me! If not….forget about it. Just kidding, I would like to know how I can make it better.

Now that you have the pie recipe, here’s the pie crust!

Pie Pastry (makes 2 9-10 inch pie crusts)

1/2 cup butter

1/2 cup shortening or lard (I use lard because I can’t have soy and its a major ingredient in most vegetable shortening)

2 1/2 cups all-purpose or pastry flour

1 tsp salt

1 tsp sugar (you can omit this if your filling is extra sweet, or if you’re making a savory pie like quiche)

1/4 cup ice-cold water

First, chunk up your butter into cubes (mine are about 1/4 tbs big) and your lard/shortening into chunks and place in a bowl or on a plate. Freeze for 30-60 minutes.

IMG_8967

The extra cold butter is what makes your curst super flaky when it is baked. If your butter melts there are no air pockets when it bakes to create that flake; whereas if the fats are still cold and firm, when the melt quickly upon baking, they create a pocket of air, which will then cause excellent flake and crispness! (code words for delicious)

In a large bowl, combine all your dry ingredients. Next, add your COLD COLD COLD butter and shortening/lard.  Using a pastry blender, cut the fats into your dry mix.

You can also do this in your food processor, which I used to do. I’ve been bringing things a bit old-school lately, and as I stated before, I’m trying to push myself with my kitchen skills, so I use this beautiful antique pastry cutter my in-laws gave me (shout-out to Mama & Papa Beyer!). Since it has the blades as opposed to the wires on the bottom you often see in modern pastry blenders, it slices into even the coldest, most firm fats quite easily.  I love this thing!

IMG_8987

Blend your fats into your dry mix until your fat pieces resemble small pebbles approximately the size of peas.

IMG_8979

Next, add your ICE COLD water, starting with 2 tbs and adding 1 tbs at a time and incorporating well until the dough just starts to come together. You can test it by pinching some of the mix together. When it stays together, you’re good. Try not to overmix, or you’ll end up with warm fat and a dense crust. (again, you can do this in a food processor, you’ll just want to test it the same way)  Here’s what you’re looking for.

IMG_8980
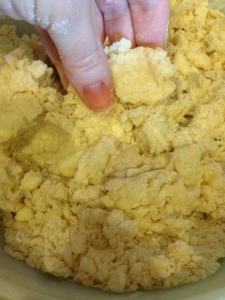
Next, dump your newly-formed dough onto your well-floured surface and start kneading it (essentially, you’re folding your dough on itself to make sure its well incorporated). If you’re finding it’s too crumbly & falling apart, try adding another tbs of your cold water and continue to knead. Again, you’ll want to do this as quickly as possible and handling your dough as little as possible in order to keep your fats cold.  Here is what you want it to look like.

IMG_8981

Lastly,  try to form your dough into a ball or round disk, then wrap in plastic wrap and chill in the refrigerator for at least 30 minutes. This will help make sure those fats are extra cold upon baking. (remember, cold fats=deliciously flaky pastry)

And that’s all she wrote (well, kind of).  You can refer to the Peach Pie recipe above for further instructions on how to roll out the dough for your pie.

As usual, let me know if you have questions or comments on how you improved on these recipes!

Love you all & Happy Eating!

Divine Interventions

Wow!  I can’t believe its been almost a year since I’ve posted!  This has become a horrible habit of mine: slacking on the blog front.  I promise to make a full effort to post more often.

Life certainly has changed in the past year.  Generally speaking, there’s not too much that has changed on the outside.  Our little monster is now 16 months old, still not walking (he’s stubborn like his Daddy…or is it his Mama?), but just as adorable and mischievous as ever.  Shelby dog will be 5 (FIVE!!!) next month, and has found a new best friend in her little human brother. We’re still living in Phoenix, AZ and loving it – especially now that the weather is slowly starting to get a little cooler. I’m still a stay-at-home-mom, but have added to that title “child care provider” and have started watching the kids of friends during the week.  It has been an adventure, but I truly enjoy having a house full of kids and watching Seth interact with other kids and learn by watching.

Seth One Year-0513

With my new role, comes some new experiments, new kid-friendly recipes and activities, and just a general “hey, let’s try this!” outlook on life. As you can see, I’ve given the blog a bit of a facelift and new focus.  While I will still post about things I’ve been posting about (aka. FOOD), I want the focus of the site to be just like its title: “Divine Intervention”.  We all need one (frankly, I think I’m in constant need of one), and should never be ashamed to admit it.  Whether it’s in the kitchen, with our kids, with our spouse, or with our faith, we can all use a little LOT of help. My goal in life is to pass the love of Christ to those around me. For me, this starts by admitting that I’m not perfect, but constantly requiring that “intervention” of God’s grace in my life.  How can I pass on this Grace to others without first admitting that I need it in my own life?  So….this blog will be honest.  I will post about failures and struggles, as well as successes, and how I’ve learned from them all.  It will also show you how I’ve attempted to show this Love and Grace on to those around me, and for those of you who know me well, know that it will primarily be through food. 🙂

Well, here goes nothing!  Hope you enjoy!

xxx

This week begins my second full week as caregiver to two extra kiddos while their folks are at work.  I also started experimenting with lunch time meals, trying to give the kids something other than sandwiches every day (I’d get bored with sandwiches, why wouldn’t they?).  Well, today, I made (mostly) homemade pizza pockets and they were a hit!  Here’s how I made them:

IMG_8975

Pizza Pockets

3 cups Bisquick (I prefer the Heart Smart Bisquick, but regular is fine, too.)

2/3 cup very warm water

2 tbs oil (I use grapeseed, but olive or canola would be ok)

Flour (for rolling out dough)

Marinara or pizza sauce of choice (I made homemade & will include that recipe, but jarred is fine)

Pizza Topping of choice (I used Canadian bacon & since they were large slices, I only used 4. Pepperoni is great, too, but you’d want 8 slices. You can also use veggies, sausage crumbles, etc.)

Approximately 1/2 cup shredded mozzarella cheese

Egg

garlic powder

salt

Heat oven to 450 degrees. Line a sheet tray with foil and coat with cooking spray or oil of choice.

In a medium bowl, mix together your bisquick, water & oil until a dough forms. Let rest for 15 minutes or so.

While your dough rests, dice your toppings into small pieces (this will make the pockets MUCH easier to eat, especially for little ones)

IMG_8971

Knead dough on a floured surface until all ingredients are uniform and divide into 8 equal balls. Flatten each ball on your floured surface, with a floured rolling pin, until approximately 1/8 inch thick.

IMG_8970

On a plate or cutting board, toward the center of each disk of dough, place a tablespoon each of pizza sauce, topping & mozzarella cheese. Be careful not to overfill. In this picture, I actually put the filling a bit too close to the edge, which caused spillage…you’ll want to learn from my mistake and place it closer to the center. 🙂

IMG_8972

Fold your dough over your toppings and seal the edges with a fork. You may find this a little easier to do without spilling toppings if you pick up the dough/fillings as you fold and let gravity help the filling stay toward the “folded” portion of dough by holding the open edge toward the ceiling and pinch the edges together to get them started. Then, lay the pocket back down on the plate to get that tight seal with your fork.  Place all your pockets on the sheet tray.

IMG_8973

Here you can see my pocket that had some spillage issues because I placed the filling too close to the edge…and I probably over filled that one a bit, too.

In a small bowl, beat one egg.  Using a pastry brush, brush the egg over the top of all your pockets and lightly sprinkle your pockets with salt and garlic powder (or you could use garlic salt and cover both bases!) and a tiny bit of mozzarella cheese (parmesan would also be good if you happen to have it on hand).

IMG_8974

Bake for approximately 15 minutes, or until golden brown.  You’ll definitely want to let them cool for a bit, as the insides are like molten lava straight out of the oven.

IMG_8975

These are also great for saving. You could refrigerate and put in the microwave to serve, or even freeze in an airtight bag or container and break out individually to heat & serve.  The toppings are also interchangeable; use whatever you like!  Even ham and cheddar could be great or a chicken Caesar with parmesan! Just make sure whatever meat filling you use is fully cooked. The only change I might make next time I make them is to add some extra seasoning to the dough itself; maybe some Italian herbs, garlic, and/or maybe even some cheese!  Customize to your & your little ones’ liking!

As promised, here’s my SUPER EASY pizza sauce recipe:

Pizza Sauce

4oz can of tomato paste

15 oz can diced tomatoes (crushed, stewed, etc. would also work fine)

salt/pepper

1/2 tsp garlic powder

1/2 tsp onion powder

1 tbs dried Italian seasoning

In a small saucepan over medium heat, place tomato paste, a bit of salt (maybe 1/2 tsp), garlic powder and onion powder and cook until you can smell that delicious cooked tomato flavor. The paste will start to turn a maroonish/brown color when its ready. STIR FREQUENTLY.

IMG_8967

Add canned tomatoes and dried herbs and stir until combined. When the sauce starts to bubble, reduce the heat to low and simmer for about 10 minutes.

IMG_8968

Taste your sauce to check for seasoning. Add salt, pepper, onion and or garlic powders if needed. If your tomatoes are very acidic, also try adding a pinch of sugar. When your sauce is done and seasoned to your liking, bust out your handy immersion blender (one of my all time favorite kitchen tools) and blend away!  (be careful not to spray it all over yourself or your kitchen, as I am known to do on a regular basis…I’m required to wear an apron around it these days) A traditional blender would work fine for this too.

IMG_8969

Ta-Da!  Now you have a thick & delicious pizza sauce!

As usual, let me know if you have questions, or if you’d like to tell me what amazing changes you made!

Love you all & Happy Eating!

It’s Pumpkin Time!!

I know I said I hoped to post on a more regular basis, but I think I seriously overestimated my ability to have free time as a stay at home mom. 🙂 I absolutely love staying at home with my son (seriously, look how freaking adorable he is!), but my days are much more unpredictable than anticipated. All I’ll post when I get a chance, when the mood strikes me, when I’m inspired, or in this case, when I make something delicious (or this time, when my husband does) and people request the recipe!

image

I love fall! Especially now that I live in the Southwest, summers aren’t exactly pleasant, but fall is incredible. I do admit, I miss the amazing colors of fall and the changing leaves of the Northwest, but at least it’s not pouring down rain. Here, it’s the time of year when it FINALLY starts to cool down to a bearable temperature, it’ll now be absolutely beautiful until about May (when it starts getting hot again), and we can finally start spending a decent amount of time outside, but mostly, I get especially excited about fall because it’s PUMPKIN SEASON!! Yes, I am one of those people who seriously takes advantage of pumpkin. I LOVE pumpkin. Really, this time of year, I am this person:

image

So my first foray into pumpkin this year (other than making pumpkin syrup for my coffee), were pumpkin muffins. I didn’t even make them. After much begging, my amazing husband made them for me. See, I’m not much of a baker. Baking is too much of a science for my taste, and I admittedly just like to throw things together and see what happens. A science of weighing and measuring ingredients, however, is right up his alley. So, I found a typical pumpkin bread/muffin recipe, jazzed it up a bit, converted it to be food-allergy-friendly, and handed it over! They were seriously one of the best things I’ve ever tasted! I’ve already eaten three today and want more. I keep telling myself if I eat them all today, I won’t have any for the rest of the week. They’re so delicious! They’re light and moist and not at all dense; you’d never know they were gluten free or vegan! So, without further ado, here’s the recipe!

Gluten Free Vegan Pumpkin Muffins
Makes 2 1/2 dozen regular-sized muffins, or 15 muffins and one 8×8 pan.

1 15-oz can pumpkin puree plus 1/2 c extra puree
2 tbs ground flax seed plus 6 tbs warm water, combined & let sit for about 5 minutes until slightly congealed
1c canola oil
2/3c water
3c sugar
3 1/2c favorite gluten free baking flour (I use Bob’s Red Mill)
3/4 tsp xantham gum
2 tsp baking soda
1 1/2 tsp salt
1 tbs pumpkin spice (recipe to follow)

Pumpkin Spice
3 tbs cinnamon
2 tsp ground ginger
2 tsp ground nutmeg
1 1/2 tsp ground allspice
1 1/2 tsp ground cloves

Combine all ingredients until well mixed.

Preheat oven to 350 degrees Fahrenheit. Line your muffin tins with paper. If using 8×8 pan, grease and flour all inside surfaces.

In a large bowl, combine all wet ingredients plus sugar (pumpkin through sugar). In a separate bowl, whisk together all remaining ingredients. Combine the two bowls of ingredients until all lumps are gone. Don’t worry about over-mixing, since there is no gluten, it won’t get tough.

Distribute batter into your baking devices, filling each muffin cup about 2/3 full and pouring remaining batter, if desired into your 8×8 pan.

Place all pans/tins into the oven, baking muffins for 30 minutes and the 8×8 pan for 65 minutes. Both muffins and loaf will be cooked through when an inserted toothpick comes out clean.

ENJOY!!! And eat a dozen for me!
As usual, let me know if you have any questions.

image

The Long Awaited Return (I brought cookies!)

Wow! I have certainly been absent from this blog for a long time; it has been ten months since my last post. I apologize for my apparent laziness, but I was a bit preoccupied having a baby! On May 9th, my husband and I welcomed our first child, Seth Edwin and we couldn’t be more in love. He is absolutely incredible and it’s amazing how quickly he changes and develops. I’m lucky enough to get to stay home with him full time and I so look forward to all the milestones I’ll get to witness.

image

Amazingly enough, while I was pregnant, all my food allergies vanished! I didn’t know if or when they would return, so I used that time to enjoy all the foods I missed while I had the chance to enjoy them! Needless to say, I didn’t have much need to discover or develop allergen-free recipes.  Now that Seth is six weeks old, some of my allergies have returned, namely gluten and dairy. So, here we are. Hopefully, now that I’m home (and once we get into our new routine and adapt to sleep deprivation), I’ll have some more time to experiment and convert favorite recipes into gluten and dairy-free recipes. I’m sure the purpose of this blog will evolve over time to become more than just recipes, but I figure it’s a great way to relaunch!

Like most new mothers, when Seth was first born, we really struggled with breast feeding. Seth just wouldn’t latch, partially because he was just too small. We struggled through together and after just more than five weeks, we now have success! During that struggle, I was doing just about everything to help boost my milk supply while I was pumping to make sure I continued to produce as much as Seth needed and to make sure I was ready for him when we did find eventual success. One of the tricks I found most enjoyable to use was lactation cookies! (Who doesn’t like cookies?) For those of you unfamiliar with the concept, they’re basically regular cookies with ingredients added that are known to increase milk supply. The issue was, all the recipes I found were heavy-laden with ingredients I couldn’t have. So, I decided to develop my own version and share it with the world. (P.S. they’re delicious!)  So, here you go!

image

Gluten-Free Lactation Cookies
2/3 c butter or margarine (room temperature)
2/3 c shortening (room temperature)
1 c white sugar
1 c brown sugar
2 eggs (room temperature)
2 tsp vanilla
1 tsp salt
1 tsp baking soda
3 1/2 c gluten-free baking floor of choice (Bob’s Red Mill Gluten-Free All-Purpose Baking Flour is my favorite)
1/4 tsp xantham gum (a necessity in almost all gluten-free baking)
2 tbs brewer’s yeast (can be found at most health food stores or online)
2 tbs ground flax seeds
1 c gluten-free oats
1 c chocolate chips

In a mixer, cream butter, shortening, and sugars. Add eggs and vanilla.

Stir together dry ingredients in a separate bowl and add to sugar mixture in 2-3 batches until well combined.

Stir in oats and chocolate chips.

Using a 1 or 1 1/2 inch cookie scoop, place on ungreased cookie sheet (I use a silpat silicon liner for easy clean-up), spread approximately 2 inches apart. I fit 12 cookies per sheet.

Bake at 375 degrees for 10 minutes. Enjoy!

You can add whatever mix-ins you like: nuts, dried fruit, etc. Also, these could be fantastic everyday cookies, just omit the brewer’s yeast, flax seeds and oats (unless, of course, you just fancy yourself some oats in your cookies).

If At First You Don’t Succeed…

Ok, so I realize its been a LONG time since I’ve posted anything, and I apologize for that. The truth is, I’ve had a lot of food failures lately. From a Peach Cobbler that ended up gelatinous, to Sweedish Meatballs that crumbled and ended up more like Sweedish Chunky Gravy. Granted, they TASTED really good, but weren’t worthy of a blog post. Rest assured, I will continue to work on these recipes and will post them as soon as if they’re successful.

One recipe I’m really excited to post for you is my Mac ‘n It’s-Not-Really-Cheese. I made it a couple weeks ago and it turned out amazingly well! I didn’t take photos along the way and post them because, honestly, how good can Mac ‘n Cheese be with non-dairy cheese?! Turns out, amazingly well! Even my cheese-loving, extremely-skeptical husband loved it. I’ll be making it again in a few weeks when my in-laws come to town and I’ll be sure to go all “documentarian” on myself and share it with you.

So, basically, just because there’s not activity on here doesn’t mean I’m not hard at work, trying to create/modify some delicious recipes for you.

Be well, people.

Everybody Loves Onion Rings!

That’s right, another post already & we’re making onion rings!! Onion Rings are one of my FAVORITE things and I was bummed when I learned of my gluten allergy because one of the things I was going to have to do without was these little gems. How wrong I was!! I finally decided to indulge and find a gluten-free way to make one of my favorite guilty pleasures.

Gluten-Free Onion Rings

2 containers of Canola oil
1 large onion, sweets are best but not necessary
1-1 1/2 c rice flour
1 tbs baking powder
2 tsp salt
1/2 tsp Garlic powder
1/2 tsp onion powder
1/8-1/4 tsp cayenne
1/4-1/2 tsp paprika
1 c Almond Milk
Gluten-free Panko (if you can’t find this at your local store, you can get them online, even on Amazon)

Heat canola oil in a fryer, stock pot, or electric pan with high sides to 350 degrees. While it is heating, slice your onion carefully into nice, thin rings. Combine all dry ingredients (flour and spices) into a gallon-size ziplock bag. Spices are approximates & to taste; if you want more or less of anything, feel free to play with the seasonings. Small bunches at a time, put your onion rings into the bag, seal & shake until coated in the dry mix (This will help the batter to stick to the onions – don’t you hate it when the coating comes off the onion before you can enjoy it?!) Place the dry-coated onions to the side. I place them on my prepared rack, which is a cooling rack with lots of paper towels underneath to catch draining oil. Newspaper works good too under the rack, but the rack is crucial, as it will allow the fried onion rings to drain, but not get soggy by sitting in their own oil.

20130617-110700.jpg

Take two small containers (8×8 baking pans work perfectly) and place the remaining dry ingredients from the ziplock bag in one & Panko in the other.

20130617-110845.jpg

To the dry ingredients, slowly add the milk & whisk together until is approximately the consistency of pancake batter. You may need more or less than the amount indicated.

20130617-111007.jpg

Once the oil has reached 350 degrees, dip rings into batter, coating the ring completely & shake off excess, then dip both sides lightly in the Panko & carefully place into oil. You can do several at a time, but be careful about filling the pan too full, or it will decrease the temperature too much. The rings will bubble. Once the edges are just starting to turn golden, turn the onion rings & continue to fry until perfectly golden brown.

20130617-111437.jpg

Remove from oil and put on your cooking rack. Repeat the dipping & frying steps until all onion rings are done & enjoy! If you’re using as a side dish & your main dish isn’t done yet, place in a fairly cool oven (225-250 degrees) to keep warm.

20130617-111534.jpg

ENJOY!! I honestly didn’t notice a difference between these and my regular onion rings!! They were delicious!!

Once the oil cools completely, pour through a funnel & strainer back into their containers & you can re-use it next time you make onion rings!

Taking It Old School

Wow…sorry it’s been so long since I posted! I think time just got away from me, & I kept forgetting to blog about the food I was making. Whoops!

So, today we’re going to take it Old School with a dish that has been enjoyed by families for decades. A couple months ago, my husband said he wanted me to figure out a way to make Tuna Noodle Casserole. He grew up with it & missed eating it. Admittedly, I had never tasted the stuff, but was willing to give it a go. First things first: I emailed my mother-in-law to get her recipe (the recipe he grew up with) and I would go from there. Now, most of you know Cream of Mushroom soup is one of the main ingredients in this casserole, and not only is dairy out of the question, but condensed “Cream of” soups aren’t exactly the healthiest item. So what did I do? I made my own version from scratch!

Cream of Mushroom Soup (Gluten & Dairy Free)

1 onion, diced
1-1 1/2 lbs mushrooms of your choice (I used Cremini), stems removed & sliced, approximately 6 c.
1/2-1 tsp dried thyme
1 1/2 c chicken or vegetable broth
4 tbs oil of choice
3-4 tbs rice flour
3 garlic cloves, minced
2 cups unsweetened, original flavor Almond Milk
Salt
Red chili flakes
Onion powder (optional)
Garlic powder (optional)

In a medium saucepan, heat a drizzle of oil for sautéing & sauté onion until translucent. Add sliced mushrooms & thyme & a healthy amount of salt & sauté until mushrooms are tender & slightly darkened in color.

Add broth & bring to a boil & reduce to simmer for approximately 5 minutes. Remove from heat & blend mixture with immersion blender, food processor or blender. Set aside.

20130611-090152.jpg

In large saucepan (4 qt plus) or soup pot, heat your 4 tbs oil at medium heat & add garlic cloves & sauté until golden (Don’t burn your garlic, or it will taste bitter). Add rice flour & stir until smooth. (add more flour or oil until its the consistency you want; you’re making a roux).

Let cook while stirring constantly for approximately 3-5 minutes. (This will help cook the “flour taste” out of the roux & give it a slightly richer flavor). Add your milk, starting with 1 cup & adding more to give you the desired consistency of a slightly thick béchamel sauce (the white sauce you make for Mac ‘N Cheese, etc). Add salt & chili flakes to taste. Cook while stirring constantly for an additional 5 minutes, adjust temperature so it simmers, but not a hard boil. Adjust seasoning for taste; the béchamel by itself should have good flavor. You can also add garlic powder & onion powder for some extra flavor. I added probably a tbs of garlic powder & 1-2 tsp of onion powder.

Add mushroom purée and stir to combine. Taste again for seasoning & add any necessary salt, chili flakes, onion powder, garlic powder or thyme. You can also add a little extra milk for a slightly creamier soup. Bring to a boil & reduce to a simmer for approximately 30 minutes, or until thickened.

20130611-090715.jpg

Now that we have the soup done, which is good even by itself, time for the casserole! Keep in mind, if you use this soup for a substitute in other recipes, if the recipe calls for added milk, you’ll either reduce the amount or omit it altogether because this soup isn’t condensed like it calls for in the recipe. You could also make cream of chicken soup by using chicken broth & adding some shredded chicken (and of course, omitting mushrooms). Or, cream of celery soup by replacing the mushrooms with celery.

Tuna Noodle Casserole (Gluten & Dairy Free)

16 oz. cooked gluten-free Rotini pasta (I use brown rice pasta & cook a minute or two short of al dente since it’ll cook more in the oven)
Cream of Mushroom Soup (recipe above; I use approximately 2/3 of the above recipe)
2 cans of tuna of your choice (I used chunk light tuna in oil)
1/2 c gluten free breadcrumbs
2-3 tbs oil
1-2 tbs Italian seasoning
Salt
Garlic powder
Onion powder

Pre-heat oven to 350 degrees. Combine pasta, tuna & soup & place in greased casserole dish of at least 2 qts. Pasta will absorb soup, so make sure it’s extra “saucy”. In a small bowl, combine oil & breadcrumbs & stir until crumbly. Season to taste with Italian seasoning, salt, garlic & onion powder. Distribute evenly over the top of the casserole & bake for 35 minutes (if all ingredients are warm; if if you made the soup ahead of time & chilled, add extra time), or until bubbly & top is golden brown.

Enjoy!

20130611-092240.jpg

When Heaven Is Not Enough

Eventually the time comes when Heaven is no longer enough; it has to. Its a sign of maturity. In this life, we go through stages – at least I did. As a small child, for those of us raised in the church and going to Sunday School, one of the first songs we learn is “Jesus Loves Me”. At that age of Innocence, Jesus is simply enough. He loves us. We know it because, as the song says, the Bible tells us so. Its enough for us, so we love Him back. There’s a reason why Christ calls us to have Faith Like a Child; its perfect and unyielding.

“I tell you the truth, anyone who will not receive the kingdom of God like a little child will never enter it.” (Luke 18:17)

The children are approaching Jesus in this passage freely, humbly, & without pretense. They don’t want anything in return. They simply love Jesus, and want to be with Him.

Later in our lives as we grow older, we often lose this free, unpretentious faith and assume an attitude of “What’s in it for me?” This is when I became guilty of focusing too much on salvation for Heaven and less on my love for Christ. My life reflected it; it became too much pressure. When living solely for a “reward” and the end of life, its as if you’re keeping score. Is what I’m doing adding up to enough to get me into Heaven?? Are my good deeds outweighing my bad deeds?? Even adding in the occasional “What would Jesus do?” Sure, I “love” Jesus, but do I LOVE Jesus?

In John Piper’s God Is the Gospel he asks:

“The critical question for our generation – and every generation- is this: If you could have heaven, with no sickness, and with all the friends you ever had on earth, and all the food you ever liked, and all the leisure activities you ever enjoyed, and all the natural beauties you ever saw, and all the physical pleasures you ever tasted, and no human conflict or any natural disasters, could you be satisfied with heaven, if Christ was not there?”

If your answer is yes, something’s not right. You may need a re-evaluation. I definitely needed re-evaluating. These days, when I think back on all God has done for me, it is difficult for my heart NOT to burst with love. Its a bit easier to reflect on some of the most obvious things with the Easter holiday so fresh in our minds. My husband and I are firm believers that Easter should be celebrated year-round but is unfortunately, for many, elevated to an unhealthy level once a year and then forgotten about for the rest of the year. For the two of us, we try not to make Easter too big of a deal, in the hopes that we celebrate the resurrection all year long (of course, this may change slightly once we have children and do Easter Egg hunts, etc.).

Ok, back from my Rabbit Trail (no pun intended…entirely). Aside from His unending grace and sacrifice on the cross for my sins, my God has been incredibly faithful! Every time Chris and I have run into a difficult place financially, God has gotten us through it (even when we didn’t know how we were going to survive)! When we didn’t know how we were going to sell our house, He put an offer on our table the same day we signed lease papers on a rental out of state. When I had been sick for over 6 years, He finally brought answers and my health has seen a 180 degree turn for the better. I could go on and on and on with the ways He has been faithful. Just listing these few things bring tears of joy to my eyes remembering them. Its not difficult for me to find true love for my God anymore. I only pray that my love for Christ will pour out of me to others and through that, they can see God’s love.

In his book, Crazy Love, Francis Chan talks about love and the freedom it gives us:

“Paul writes in Galations 5:13-14:

You, my brothers, were called to be free. But do not use your freedom to indulge the sinful nature; rather serve one another in love. The entire law is summed up in a single command: “Love your neighbor as yourself.”

When we love, we’re free: We don’t have to worry about a burdensome load of commands, because when we are loving, we can’t sin. Paul writes in the same chapter (v. 6) “The only thing that counts is faith expressing itself through love.”

Unlike the pressure of “keeping score” before, Christ’s love provides freedom! Of course I screw up! There are times when I am unloving; I am imperfect. But thankfully, Jesus is perfect and He has conquered all. I don’t have to hold myself to a standard of perfection; only a standard of grace, because I love Jesus and He loves me.

I look forward with JOY to the day when I can see Him in Heaven and for me, Heaven alone would never be enough.

Just a Little Chicken

So, my husband has always made the most amazing oven-fried chicken. Every since we got married, it’s been a favorite of mine and I request it for every birthday dinner, every special occasion, every comfort meal, and every time he asks me,

“What would you like for dinner, Sweetheart?”

I purposefully never learned how to make it, because its extra-special when he makes it. Um technically, since I’m putting the “new” recipe up on the blog, I know how to make it, but I’m claiming ignorance anyway; it’s just not the same.

When I found out about my food allergies, I was really bummed that I wasn’t going to be able to have my favorite chicken anymore, because it contained several things that I couldn’t eat anymore. So, we broke out our thinking caps and tried to think of a way to alter the recipe to be Allergen-free.

Chris’s Oven-Fried Chicken Thighs

Family Size Pack of Bone-In, Skin-on Chicken Thighs
Rice Flour
Canola Oil
Salt
Cayenne Pepper
Garlic
Cumin
Smoked paprika
Dill
Red pepper flake

Trim excess fat off chicken thighs and overhanging skin with kitchen shears.

20130327-103636.jpg

Once all the chicken is trimmed, pour a few tbs canola oil into a small dish.

20130327-104240.jpg

Also, pour approximately 1/2 cup to 1 cup rice flour onto a papertowel

20130327-104335.jpg

Preheat oven to 400 degrees. Using a pastry brush, brush canola oil onto a broiler pan or a rack in a 9×13 pan (so excess fat can drip off chicken). Then also use brush to brush skin side of chicken, then roll skin side of chicken into rice flour & barely pat non-skin side in flour. (The skin side will need the crispiness the oil/flour coating will bring, while the underside will just be barely coated to help keep chicken moist.) Repeat with all thighs.

20130327-104823.jpg

20130327-104844.jpg

Feel free to pack the chicken on the pan. Since you’re on a broiler pan & heat will get under the chicken, crowding the pan won’t really affect you in this case.

20130327-104954.jpg

Sprinkle with approximately 1 tsp of each of the spices listed above. You can add more or less of any if one is a favorite or you don’t care for one. Chris eye-balls it.

20130327-105205.jpg

Roast in the 400 degree oven for one hour. You’ll be able to smell the delicious, juicy, crispy-skinned chicken long before its done! I hope you enjoy it as much as I do. If not, MORE FOR ME!! It’s fantastic with BBQ sauce. I usually peel the skin off & eat it, then tear into the chicken with my fingers. Ooh, it’s making me hungry, just thinking about it!

20130327-105452.jpg

Also fantastic with wings, just reduce the roasting time to about 40 minutes & add your favorite wing sauce (I recommend Stubbs).

ENJOY!

**UPDATE**
If you’re not allergic to them like I am, you can just use regular wheat flour instead of rice flour and spray the chicken with Pam instead of having to brush it with canola oil. Makes the work a bit quicker & more convenient. 🙂

Blog at WordPress.com.

Up ↑